HED schema developer’s guide
A HED schema is a structured vocabulary of terms that can be used in HED annotations. The HED standard schema contains basic terms that are common across most human neuroimaging, behavioral, and physiological experiments. The HED ecosystem also supports HED library schemas to expand the HED vocabulary in a scalable manner to support specialized data annotations.
This guide describes how to begin developing your own library schema or contribute to existing HED vocabularies. If you have questions about how to get started, please post an issue on the hed-schemas issues GitHub forum or email the HED maintainers. The HED Working Group would be happy to give you technical guidance in getting started and working through the process to final release.
More detailed information is available in the Library schemas chapter of the HED specification.
Details about syntax are available in the Schema formats section and the Schema format details chapter of the HED specification.
Schema design basics
A HED schema is structured as a set of trees, each of which corresponds to a major term category for the vocabulary.
Before developing a schema, you should explore the standard schema and other available schemas using the HED Schema Viewer. Major categories unfold into multiple levels of subcategories, which allow for fine-grained data-annotation, as illustrated in the excerpt a screenshot of the HED schema browser viewing HED standard schema version 8.2.0.
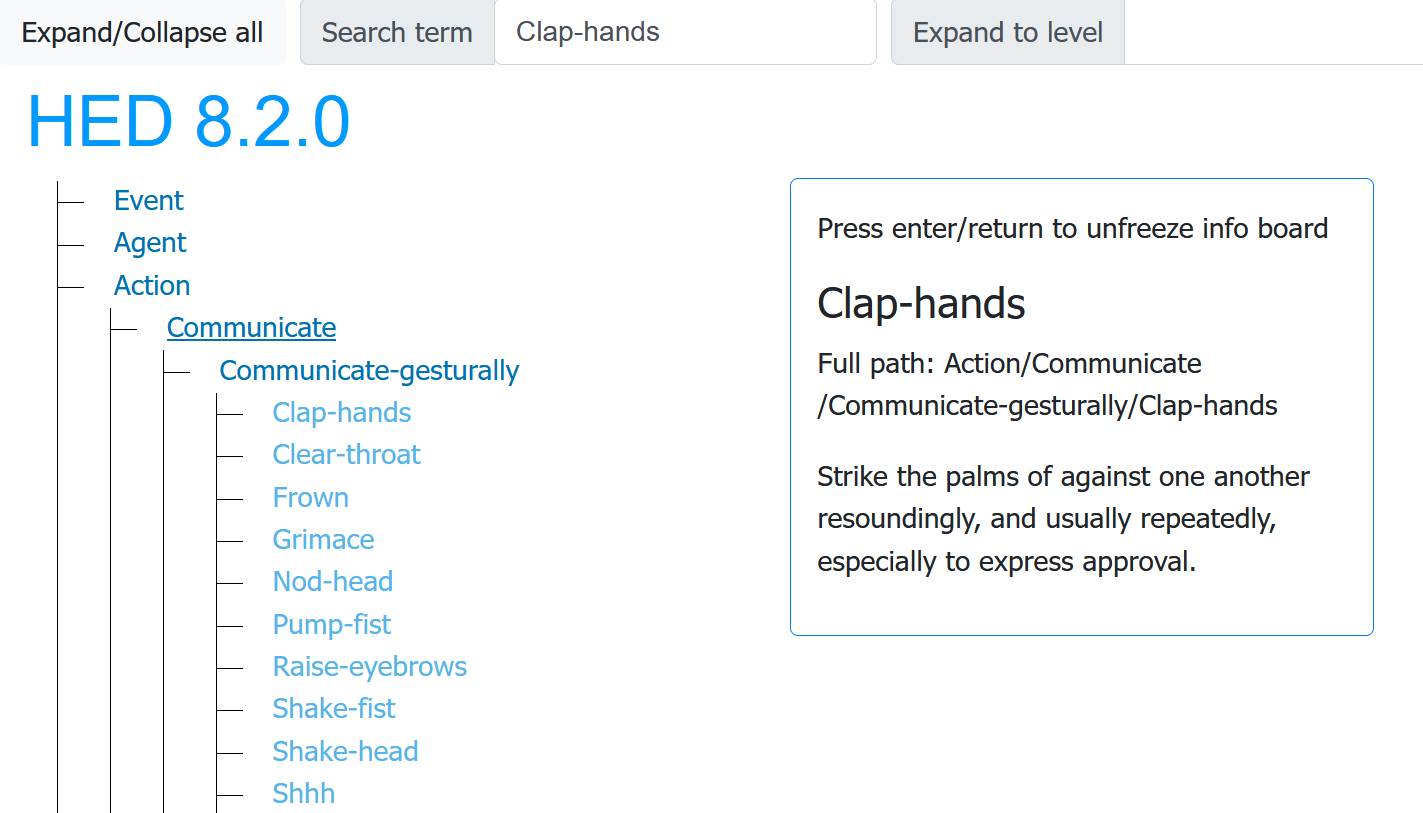
The text box on the right shows the details of the tag your cursor is hovering over,
in this case the Clap-hands tag.
The Clap-hands tag is in the Action
subtree, but is 3 levels down:
Action→Communicate→Communicate-gesturally→Clap-hands
Notice that each level down gives a more specific instance of its parent node.
The Clap-hands tag is the short form of the tag, while the full path in the schema
tree:
Action/Communicate/Communicate-gesturally/Clap-hands
is called the long-form.
Top-level as categories
As a vocabulary designer, you should think about the major categories
that are appropriate for your schema
in selecting top-level nodes to anchor your schema’s major categories.
For example, the standard schema has the following top-level tags:
Event, Agent, Action, Item, Property, and Relation.
Is-a
An important feature of HED schemas is that each child (path successor) extends or
specializes its parent (predecessor) in the hierarchy.
Thus, Clap-hands is a type of Communicate-gesturally action.
The is-a relationship between a child term and its ancestors in the hierarchy is fundamental
to HED and enables search generality: a search for Communicate-gesturally will return
annotations that contain any of this tag’s descendants (e.g., tags such as Nod-head,
Pump-fist, etc.).
Orthogonal design
Independent terms should be part of different subtrees in the schema.
This is specifically relevant for terms that represent properties.
Left-handed is not a type of Item/Biological-item/Organism/Human,
but a characteristic of such an Item.
Left-handed is a type of Property
Conflating properties with subcategories breaks search generality.
Uniqueness and forms
All tags (vocabulary terms) in a HED schema must define a unique concept.
The tags themselves must be unique as well, so the short-form Clap-hands uniquely specifies the term,
as does any partial path: Communicate-gesturally/Clap-hands,
Communicate/Communicate-gesturally/Clap-hands and
Action/Communicate/Communicate-gesturally/Clap-hands.
Choosing tag names
Each individual tag in your vocabulary must stand by itself — that is, its meaning should be clear. Tags must be unique and must be distinct from the tags in the standard schema. You should also try to avoid overlap with tags from other libraries if possible.
Tag names may only contain alphanumeric characters, hyphens, and underbars. No blanks are allowed. Except for certain SI unit designators, HED tags are case-insensitive. However, the tag names in the schema should follow the following conventions:
The first character of tag names starting with a letter is capitalized.
All letters in a tag name except for the first character are in lower case.
Tags representing multiple words are hyphenated.
The Naming conventions section of the HED specification gives a complete discussion of naming conventions.
Design principles for schema
All HED schema (both the standard and library schemas) must conform to certain design principles in addition to properly validating.
Rules for HED schema design.
[Organized] Top-level nodes represent categories. If possible, a schema sub-tree should have no more than 7 direct subordinate sub-trees to ensure human readability.
[Sub-classed] Every term in the hierarchy satisfies the is-a relationship with its ancestors in the schema tree. In other words if B has A as an ancestor in the schema hierarchy, then B is an example of A. Searching for A will also return B (search generality).
[Orthogonal] Terms that are used independently of one another should be in different sub-trees (orthogonality).
[Unique] Every term must be unique within the schema and must conform to the rules for HED schema terms.
[Meaningful] Schema terms should be readily understood by most users. The terms should not be ambiguous and should be meaningful in themselves without reference to their position in the schema hierarchy.
Deciding partnership
While developing a schema as a standalone vocabulary is supported, it is strongly recommended that library schemas partner with the (latest) standard schema, and this schema guide assumes that you are going to develop a partnered library.
For more detailed rules and syntax about partnering see the Partnered schemas section of the HED specification.
Unpartnered libraries
The standard schema provides the basic terms needed for annotating events in most experiments. A library’s role is to provide additional specialized vocabulary for a specific application. If multiple schemas are used to annotate a datasets, the tags from one of the datasets must be prefixed with a user-selected namespace designator as shown in this schematic.
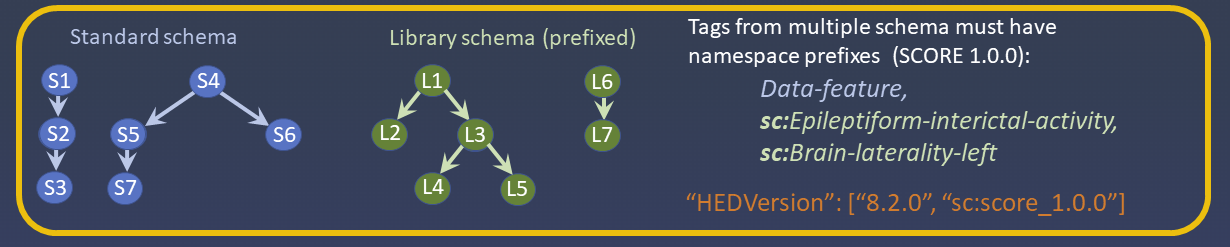
Here the standard schema (blue nodes) and an unpartnered
library schema (green nodes) are used in an annotation.
Each of these schemas could be used individually in a dataset
without reference to the other.
However, if annotations in a dataset use more than one schema,
tags from one of the schemas must be prefixed with a namespace designator.
The choice of which schema’s tags will be prefixed is up to the user.
In the example on the right of the diagram, the tags from SCORE library version 1.0.0
are prefixed with sc: as indicated by the HEDVersion specification at the bottom.
Partnered schemas
Most applications need terms from both the standard schema and possibly a library schema. For this reason the concept of partnered schemas was introduced. Schema partnership means that a library schema is merged with a specific version of the standard schema when the library schema is distributed with its standard schema partner as a single schema. Tags from both the library schema and its partnered standard schema can be used without prefixes as shown in the following schematic. Note that tags from other additional schemas will still need to be prefixed.
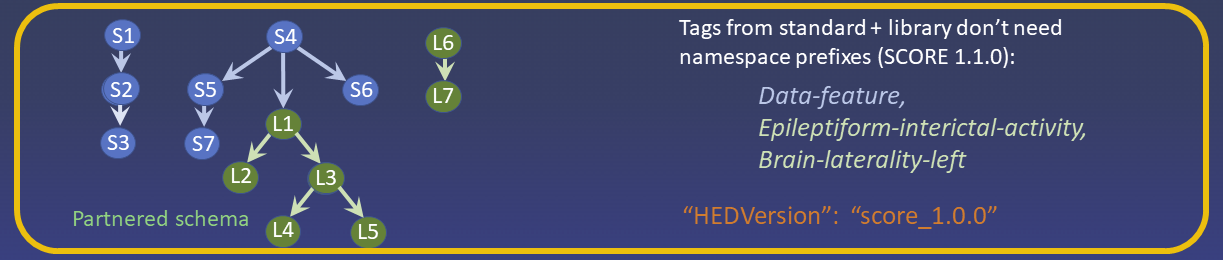
Here the standard schema (blue nodes) and its partnered library schema (green nodes) are merged and viewed as a single schema when the schema is validated and distributed.
Notice that some green nodes in the diagram are children
of nodes in the standard schema.
While some top-level nodes in your library schema may represent categories that stand by themselves,
it is likely that other nodes are elaborations of terms that already exist in the standard schema.
You can declare a top-level node in your schema (and its attached subtree)
to be placed under a node in the standard schema by giving it the rooted=XXX
attribute, where XXX is the name of the parent node in
the standard schema under which the subtree should be rooted.
Warning
Whether a particular library schema version is partnered or unpartnered is fixed when the library is released and cannot be changed.
For example, SCORE version 1.0.0 is unpartnered, but SCORE version 1.1.0 is partnered with standard schema version 8.2.0.
Why partnership?
There are many advantages to partnered libraries over standalone libraries, which are summarized here:
Advantages of schema partnership.
[top-level categories] As previously indicated the top nodes of a HED schema should represent the main categories of your schema. The top categories of the HED standard schema are essential to describing much of reality, and most library schemas will contain concepts that appropriately fit these categories.
For example, a library schema to describe experiments using driving simulators would expand on the category of actions to describe actions relevant for driving. Partnering to the standard schema reduces workload on the schema developers, as top-level categories help to organize relevant terms into stable categories.
[search generalizability] By rooting the terms of your library schema within the standard schema, you can take advantage of search generalization.
For example, a search for
Actioncould also return actions relevant for driving.
[structural tags] There are special tags in the HED standard schema, such as
OnsetandOffset, that have special meaning and HED-compliant tools handle them in specific ways. If you want to use any of special features of HED such as definitions, you will need to use the standard schema anyway.
[schema attributes] If you create a standalone schema library, you must duplicate from the standard schema all the special sections including value classes, unit classes, schema attributes, and schema properties.
Naming your schema
Before starting, you must decide on a name for your schema. It should be a relatively short, informative, alphabetic string. The name can be an acronym or a meaningful name, but it cannot be the same name as any other recognized HED schema.
The score library, for example, is named for an acronym based on its derivation from the SCORE standard: Standardized Computer Based Organized Reporting of EEG. The lisa library, a language schema now in prerelease, has a name representing the acronym LInguistic Stimuli Annotation. A good name for a schema with vocabulary describing simulated driving experiments might be drive.
Creating your schema
The following sections briefly describe how to go about actually creating your schema files.
Introducing MediaWiki
Schema developers work with HED schema in .mediawiki format for ease in editing.
MediaWiki is a markdown-like text format that can be displayed
in GitHub in a nicely formatted manner for easy editing.
MediaWiki was chosen as the developer format because of its clear representation of indented outlines (or equivalently, trees) as illustrated in the following example:
Example: Top-level node and children in MediaWiki format.
'''Top-level-1''' <nowiki>[The best top-level node in this schema.]</nowiki>
* Child-1 <nowiki>{extensionAllowed}[A child of Top-level-1.]</nowiki>
** Grandchild-1 <nowiki>[A child of Child-1.]</nowiki>
* Child-2 <nowiki>[A child of Top-level-1 that cannot be extended.]</nowiki>
The MediaWiki GitHub previewer shows this as:
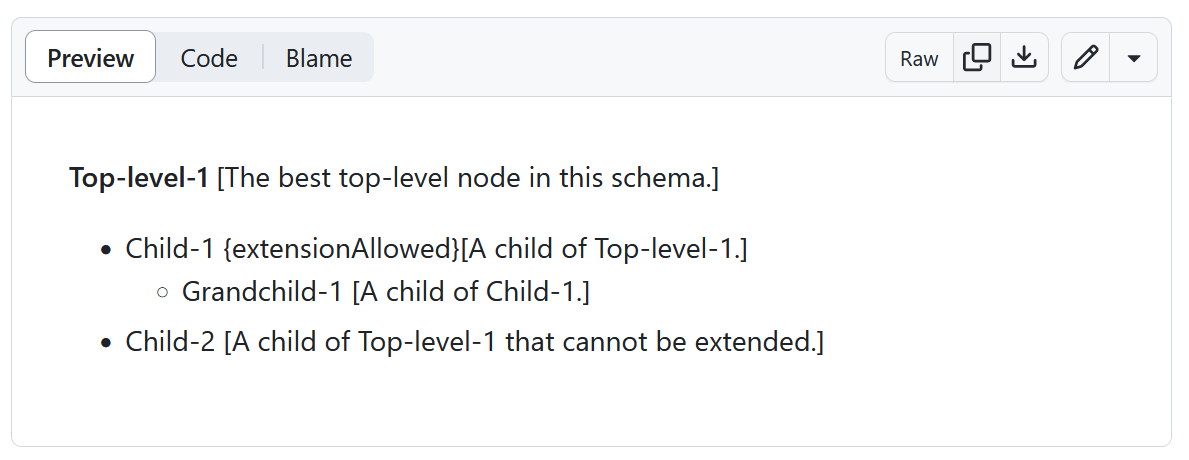
Each line in the MediaWiki file represents a distinct tag (or other schema entity),
so Top-level-, Child-1, Grandchild-1, and Child-2 are all
tags or terms in the schema.
Lines defining tags cannot be split.
Everything after the tag name should be enclosed in
<nowiki> </nowiki> delimiters.
The tag description appears in square brackets ([ ]),
while schema attributes such as extensionAllowed are
enclosed in curly braces ({ }).
The tag Top-level-1, which is a top-level tag or root of one of the schema’s trees,
represents a major category in the schema. Top-level tags are enclosed in
sets of three consecutive single quotes.
In contrast, child tags such as Child-1 appear on lines that start
with 1 or more asterisks (*), indicating the level of indentation or
alternatively depth in the schema tree.
Defining a schema
We assume that you are going to develop a partnered library schema, which requires only the schema tags and no auxiliary sections. Unpartnered schemas require that all auxiliary sections be provided, while partnered schemas use the auxiliary sections from their standard schema partner.
The following illustrates the format for using an exemplar library schema called drive.
Example: Driving library schema (MEDIAWIKI template).
HED library="drive" version="0.0.1" withStandard="8.2.0" unmerged="true"

'''Prologue'''
Drive has tags of interest to driving experiments.

!# start schema

'''Vehicle-part''' <nowiki>{rooted=Device}[Parts of a vehicle of any kind.]</nowiki>
* Steering-device <nowiki>[The part of a vehicle used for steering.]</nowiki>
** Steering-wheel <nowiki>[A wheel used for steering as for a car.]</nowiki>
** Steering-yoke <nowiki>[A horizontal column used for steering, primarily in aircraft.]</nowiki>
* Brake-device <nowiki>[A part of a vehicle used for steering]</nowiki>

!# end schema

!# end hed
Notice that this schema does not include any auxiliary sections — these are inherited from the standard schema.
This schema would be saved in a MediaWiki file called HED_drive_0.0.1.mediawiki.
To start developing simply replace “drive” with the name of your schema
and replace the drive tags with your own.
Checking syntax
While developing, you should validate your schema frequently using the HED online tools. The screenshot shows the user interface for validating your schema using the online tools.
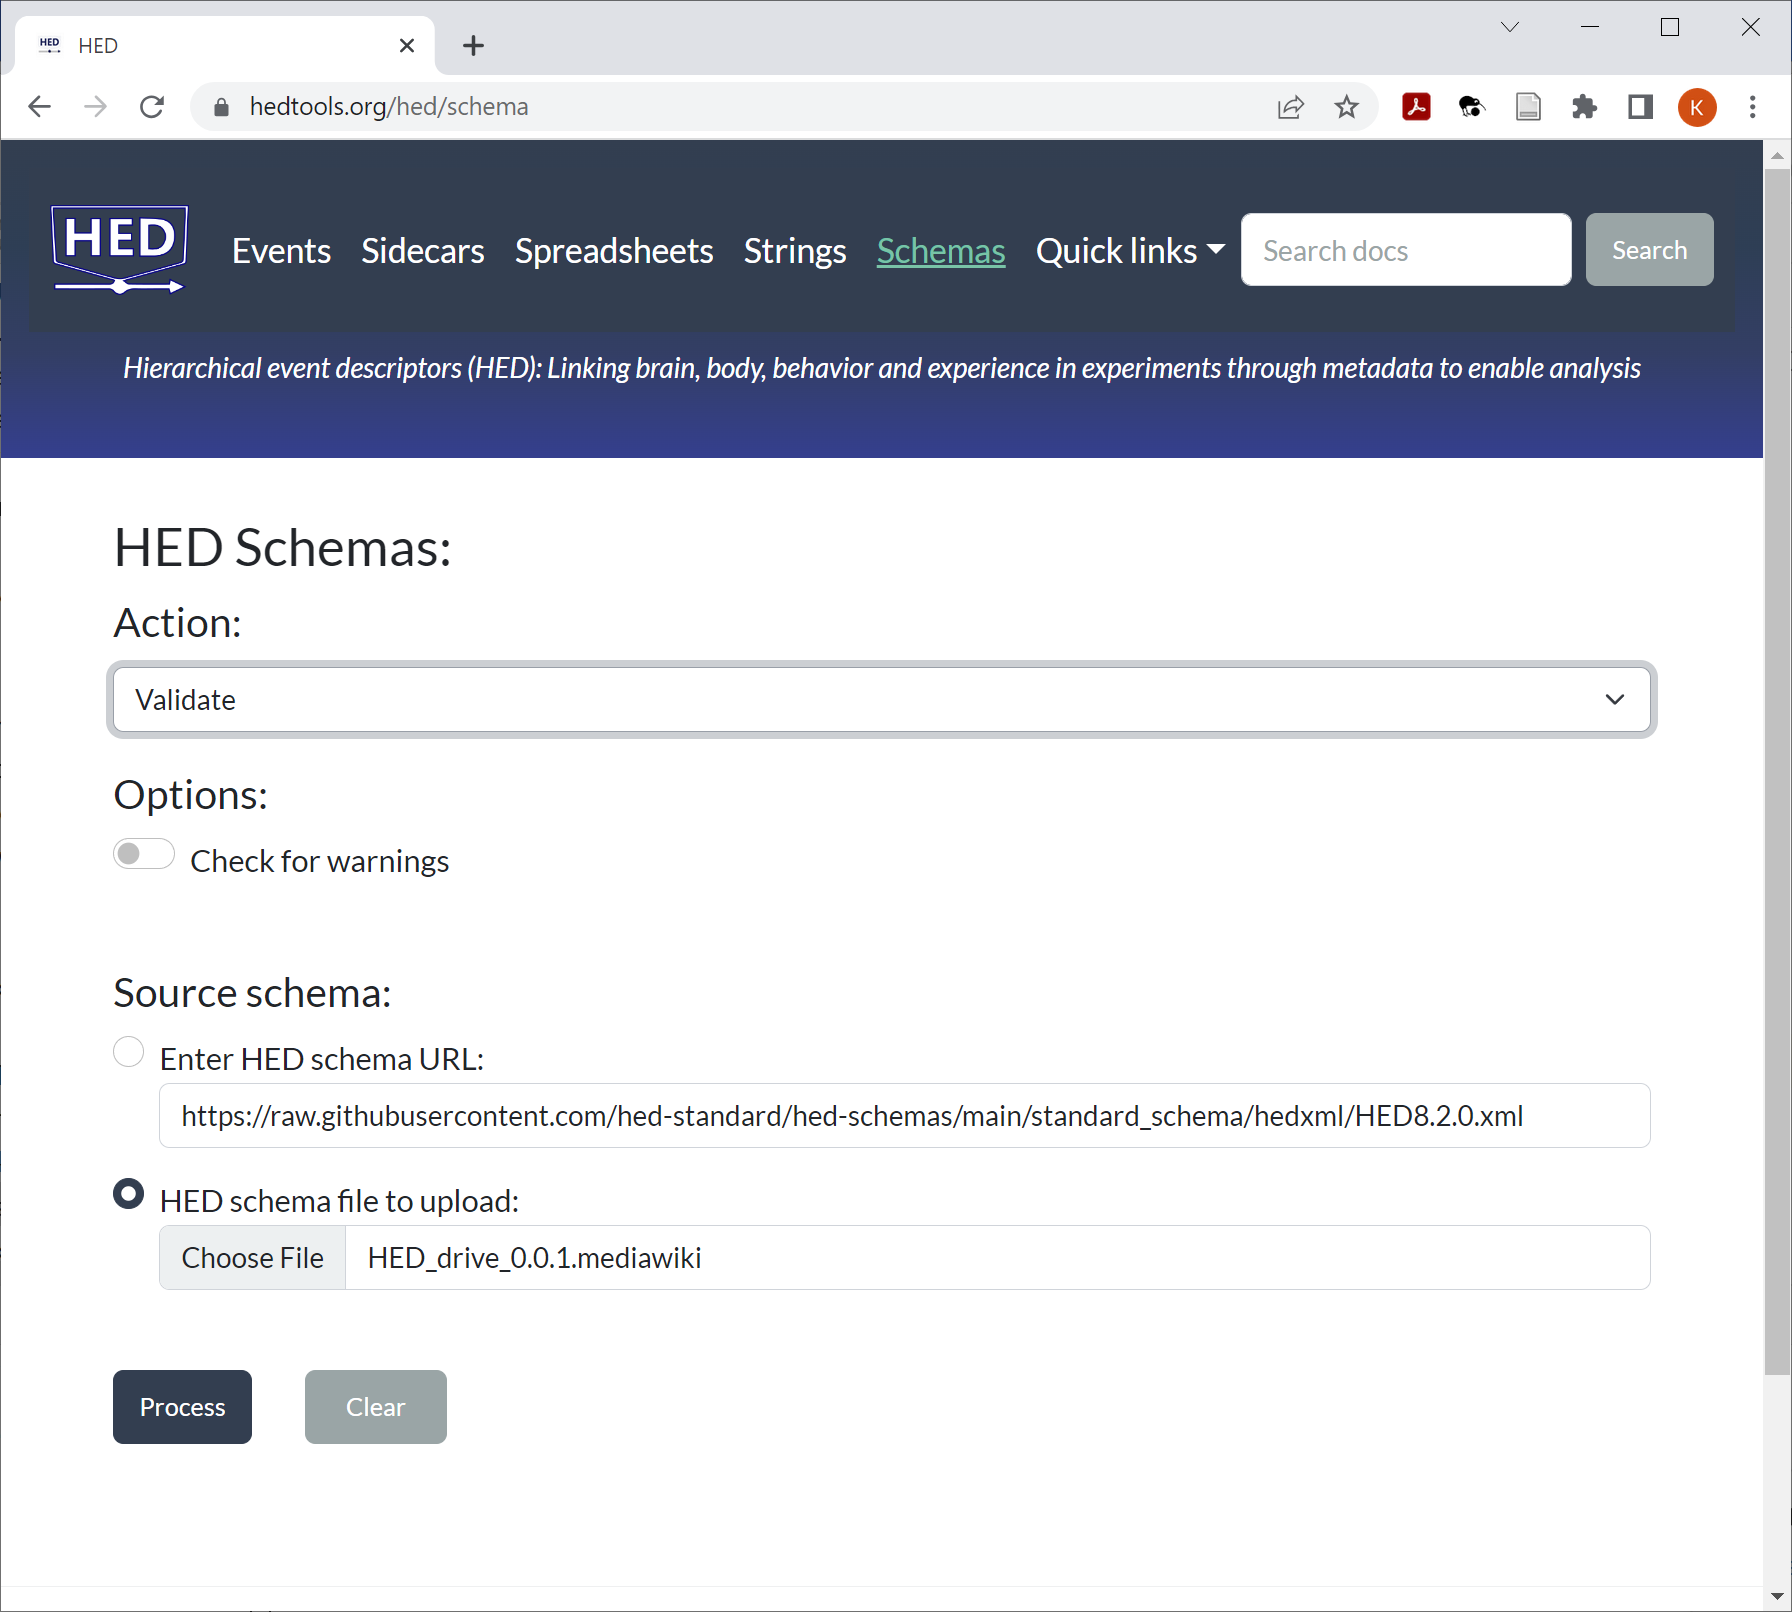
Simply choose the MediaWiki file you wish to validate, select the Validate action and press Process. If your file has errors, a text file containing the errors will be available for download.
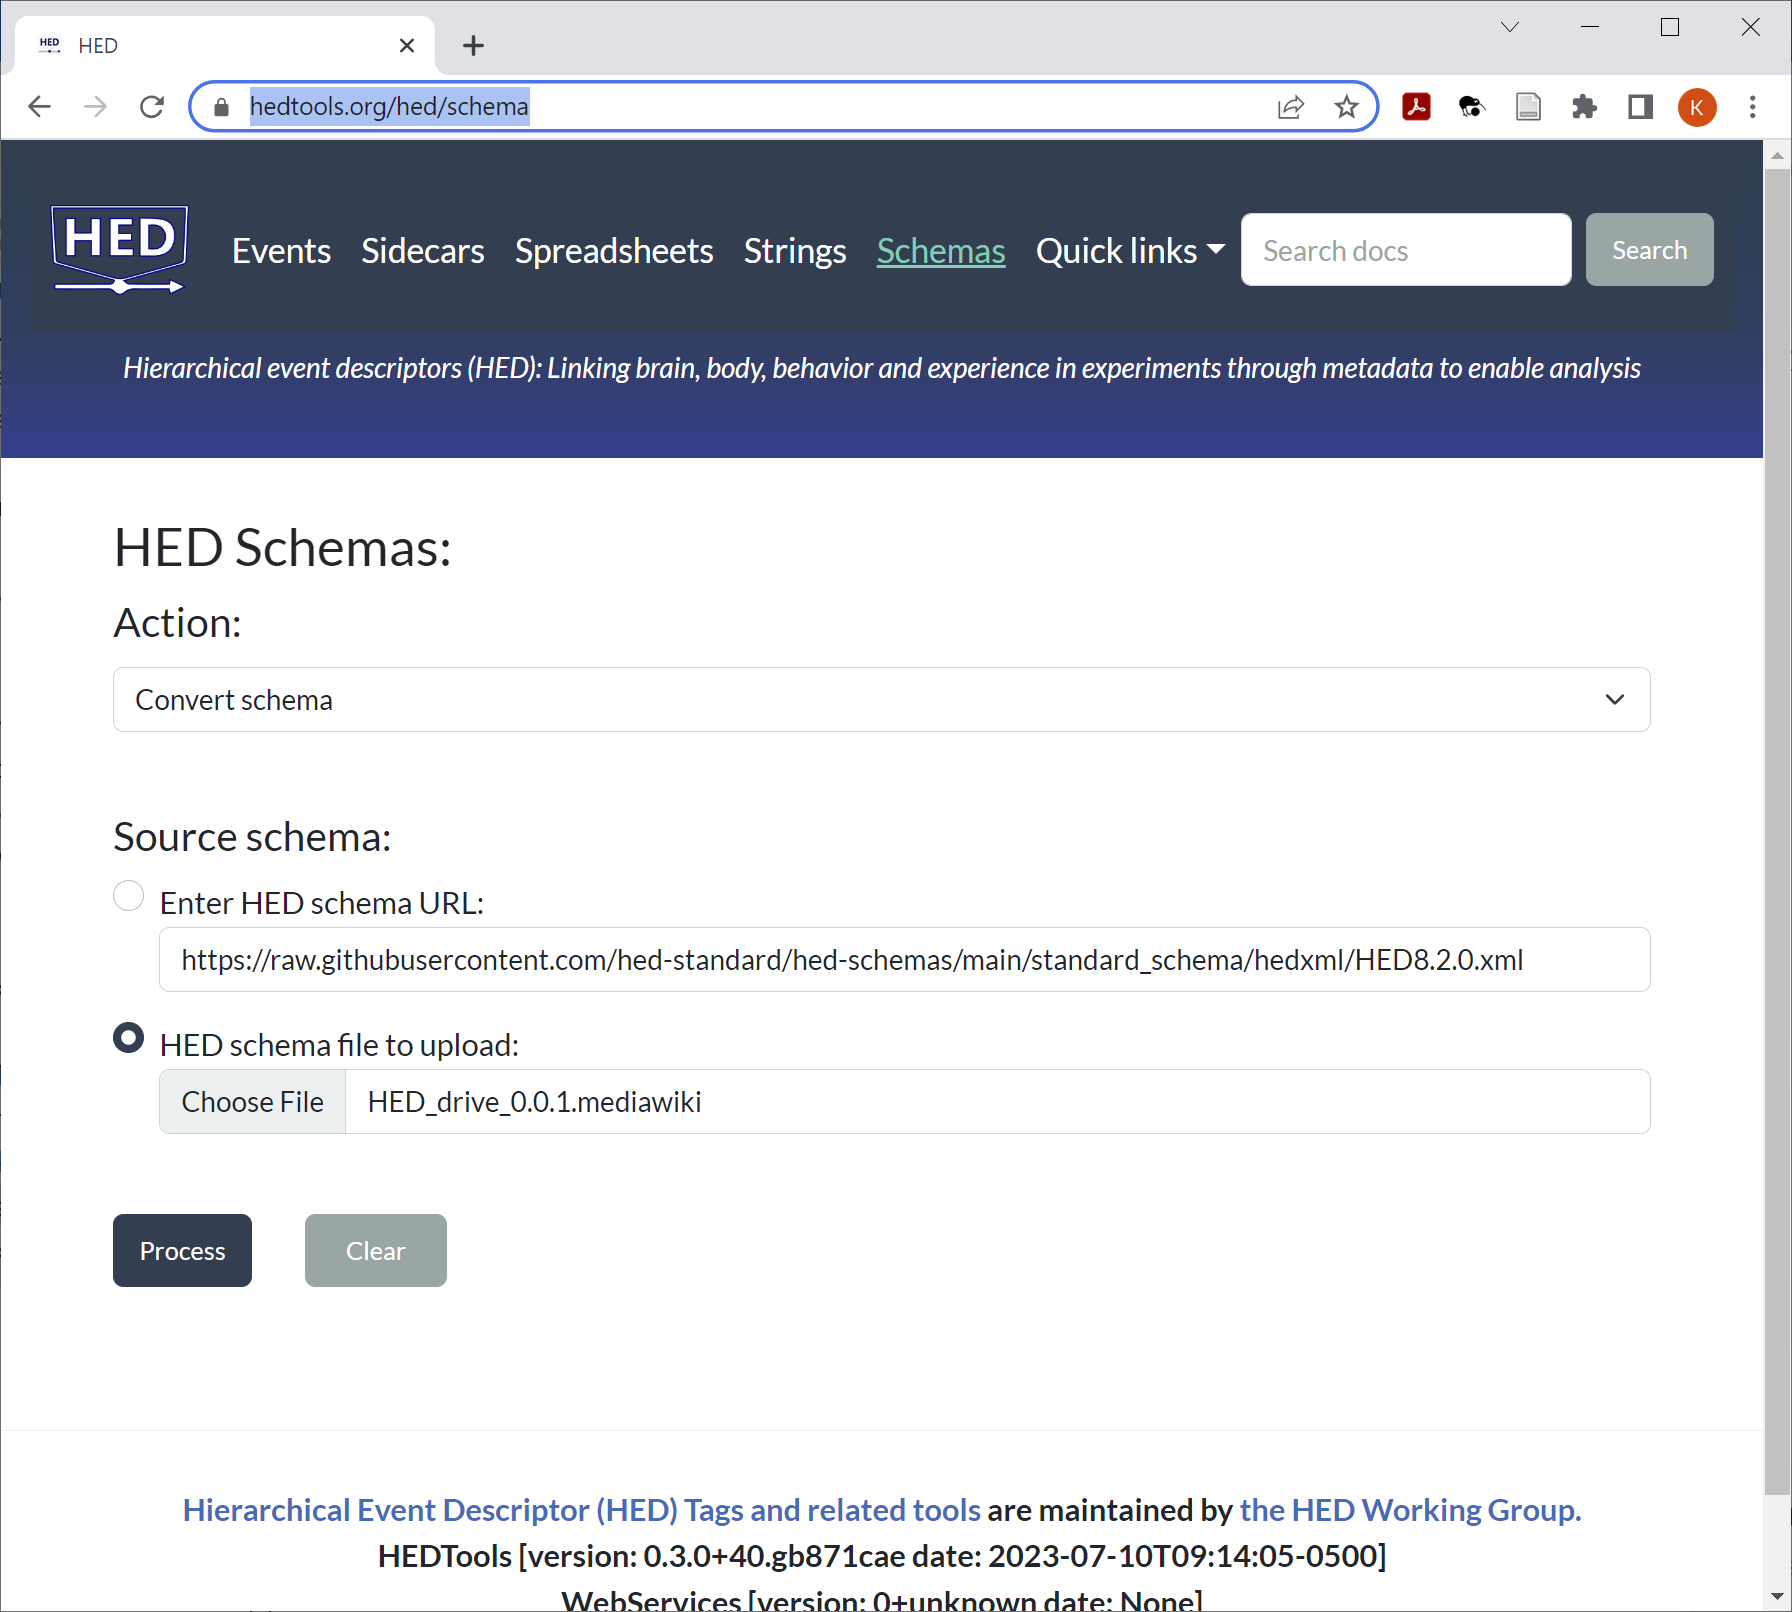
Converting to XML
Although developers use the MediaWiki format, tools access the schema in XML format. Use the HED online tools to convert as shown in the following screenshot:
Schema versions
All HED schemas, including library schemas, adhere to semantic versioning. The rules for what constitutes major, minor and patch changes are given in the hed-schemas README.md.
Schema file names
Suppose you are just starting to create a library called drive for
a vocabulary specific to simulated driving tasks.
The file name for the first version of your schema should be HED_drive_0.0.1.mediawiki.
This file will eventually go in your prerelease directory
on hed-schemas.
Becoming official
Getting listed
To get recognized as a HED library schema project, post an issue to issue forum of the hed-schemas GitHub repository with a brief overview of your schema, its purpose, and the GitHub names of your development team. The HED Working Group will work with you to get started.
As part of the initiation process, the HED maintainers will create a subdirectory in the library_schemas subdirectory of the hed-schemas GitHub repository. The name of this new directory will be your schema name in lowercase. This newly created subdirectory will be your development team’s working directory.
A basic README.md file will be created in your schema subdirectory.
You should update this file to be informative.
As an example, the working directory for the SCORE library team is hed-schemas/library_schemas/score. This directory has the following subdirectories:
hedxml contains the released versions of the schemas in XML format. Once a file is placed in this directory, it should never be modified. You will need to create a new version to make corrections.
hedwiki contains the released versions of the schemas in MediaWiki format. Once a file is placed in this directory, it should never be modified. You will need to create a new version to make corrections.
prerelease is the working directory for the schema development team.
README.md contains an informative overview of your library schema.
You will use the GitHub Pull Request (PR) mechanism to make changes to your prerelease subdirectory.
This directory will contain both the MediaWiki and XML versions of your draft schema.
The XML version is needed so that you can view your schema via the
HED Schema Viewer.
You will also be asked to create and maintain a documentation page for your schema. For example, the score library Markdown document is located in the hed-schemas/docs/source/hed_score_schema.md file in the hed-schemas repository. Your documentation page will be similarly named and located — just replace the word score with your library name.
Your documentation page will be available on the HED schemas documentation site.
Proposing changes
As development proceeds, all changes are made through the GitHub pull request (PR) mechanism. Changes will be reviewed by one or more of the HED maintainers to make sure that they don’t impact other HED schemas and conform to the HED design requirements. HED follows an open process so comments on the PR may be made by any GitHub user.
When making a change, you should add a bullet point describing
the modification in the CHANGES.md file.
You should edit the .mediawiki file in the prerelease directory
and replace the .xml file with the converted version of your new .mediawiki file
(via pull request of course).
To engage your user community in discussion about a proposed modification, post an issue to the issue forum of hed-schemas. Start the title of the issue with the name of your library to flag it for your users.
As modifications to the HED schema are proposed, add them to your PROPOSED.md file.
When the change has been agreed upon, modify your schema files and update CHANGES.md
and other files as described above.
Examples of these files for the standard schema can be found in the standard schema prerelease directory.
Prereleases are all viewable in the HED Schema Viewer
Releasing a schema
Upon final review, the HED maintainers release your schema.
During this process, your prerelease XML file will be copied to your library schema’s
hedxml directory, and your prerelease .mediawiki file will be copied to your library schema’s hedwiki directory.
The prerelease CHANGES.md will be added to the CHANGELOG.md file which is
at the top level of your library subdirectory in hed-schemas.
You may decide to update the version number in this process.
For example, schema developers might choose the version number of their first
release to be 1.0.0 rather than 0.0.1.
After final checks, the HED maintainers will create a zenodo entry for your library and obtain
a DOI to with a badge to add to your README.md file and to the overall README.md file.
Summarizing the process
Here is a brief summary of the development process.
Standard development process HED libraries.
Choose a schema name.
Get listed on hed-schemas.
Request a branch be created on hed-schemas for your development.
Develop your schema:
Modify your prerelease
.mediawiki.Validate the prerelease
.mediawikifile using the HED online tools.Convert to the prerelease
.mediawikifile to.xmlusing the HED online tools and replace the existing prerelease.xml.Check the schema using HED Schema Viewer.
Update your prerelease
CHANGES.mdandPROPOSED.mdfiles.Update your schema’s
README.md.Create and/or modify your schema’s documentation page.
Do a GitHub pull-request to your schema’s GitHub branch.
Repeat until ready to release a permanent version.
Release your schema:
Choose the final version number.
Get final reviews.
Request release by posting an issue.
Comment and approve final release PR created by hed-maintainers.
Further documentation
The documentation on this page refers specifically to the HED vocabulary and supporting tools relevant to developing a library schema. Additional documentation is available on the following sites:
HED project homepage
directs users to appropriate places to find information.
HED organization
GitHub organization that houses the repositories holding HED source (all of which is open).
hed-schemas
GitHub repository houses all HED schemas in a form that can be accessed by tools at runtime.
HED Resources
the main website for HED documentation and tutorials.
HED Specification
displays the HED specification.
HED Schema Viewer
allows users to explore the schemas that have been uploaded to hed-schemas.