HED MATLAB tools
There are currently three types of support available for HED (Hierarchical Event Descriptors) supports in MATLAB:
HED services in MATLAB - web services called from MATLAB scripts
EEGLAB plug-in integration - EEGLAB plugins and other HED support
Python HEDTools in MATLAB - explains how to call the HED python tools from within MATLAB.
HED services allow MATLAB programs to request the same services that are available through the browser at https://hedtools.edu/hed.
HED services in MATLAB
HED RESTful services allow programs to make requests directly to the HED online tools available at https://hedtools.edu/hed or in a locally-deployed docker module. See HED-web for additional information on the deployment.
The runAllTests.m is a main script that runs all the example code and reports whether the code runs successfully. You should start by running this script to make sure everything is working on your system, that you have Internet access, and that the HED services are available.
This script also demonstrates how to call the individual test functions. Each test function takes a host URL as a parameter and returns a list of errors. The individual test scripts illustrate how to call each type of available web service.
Target |
MATLAB source |
Purpose |
|---|---|---|
Overall |
Harness for running all tests. |
|
Overall |
List available services. |
|
Events |
Validation, conversion, sidecar generation. |
|
Events |
Search, assembly. |
|
Schema |
in progress |
For schema library developers. |
Sidecars |
Validation, conversion, extraction, merging. |
|
Spreadsheets |
Validation, conversion. |
|
Strings |
Validation, conversion. |
Overview of service requests
Calling HED services from MATLAB requires the following steps:
Set up a session:
Establish a session by requesting a CSRF token and a cookie.
Construct a header array using the token and the cookie.
Create a request structure.
Make a request using the MATLAB
webwrite.Decode the response returned from
webwrite.
Usually, you will do the first step (the session setup) once at the beginning of your script to construct a fixed session header that can be used in subsequent requests in your script.
Setting up a session from MATLAB
The goal of the session setup is to construct a header that can be used in subsequent web requests.
The first step is to call the getHostOptions.m.
This function constructs the services URL from the host URL.
The function also makes a service request to obtain a CSRF token and a cookie.
The function then constructs a header and calls the MATLAB weboptions function
to get an options object suitable for use with the MATLAB webwrite function
use in all of our examples.
Establish a session.
host = 'https://hedtools.ucsd.edu/hed';
[servicesUrl, options] = getHostOptions(host)
The host should be set to the URL of the webserver that you are using.
The call to getHostOptions, only needs to be done once at the beginning of your session.
The servicesURL and the options can be used for all of your subsequent requests.
The getHostOptions does all the setup for using the services.
As indicated by the code below, all communication is done in JSON.
However, as demonstrated below, the MATLAB webwrite function
takes a MATLAB struct as its request parameter and internally
converts to the format specified in the header before making the request.
The Timeout parameter indicates how many seconds MATLAB will wait for a response
before returning as a failed operation.
The timeout value of 120 seconds is sufficient for most situations.
However, but this can be adjusted upward or downward to suit the user.
The HeaderFields sets the parameters of HTTP request.
Source for getHostOptions.
function [servicesUrl, options] = getHostOptions(host)
    csrfUrl = [host '/services'];
    servicesUrl = [host '/services_submit'];
    [cookie, csrftoken] = getSessionInfo(csrfUrl);
    header = ["Content-Type" "application/json"; ...
              "Accept" "application/json"; ...
              "X-CSRFToken" csrftoken; "Cookie" cookie];

    options = weboptions('MediaType', 'application/json', ...
                         'Timeout', 120, 'HeaderFields', header);
In the following examples, we assume that getHostOptions has been called to retrieve
servicesUrl and options for use in the session.
Creating a request structure
The request structure is a MATLAB struct which must have a service field and can have an
arbitrary number of fields depending on which service is being requested.
The simplest service is get_services,
which returns a string containing information about the available services.
This service requires no additional parameters.
Request a list of available HED web services.
request = struct('service', 'get_services');
response = webwrite(servicesUrl, request, options);
response = jsondecode(response);
The MATLAB webwrite returns a JSON structure as specified in the options.
The MATLAB jsondecode function returns a MATLAB struct whose format is explained
below in Decoding a service response.
Except for get_services, all other services are of the form target_command
where target is the primary type of data acted on (events, schema, sidecar, spreadsheet, or string).
The possible values for command depend on the value of target.
For example sidecar_validate requests that a JSON sidecar be validated.
The get_services command provides information about the HED services that
are available and the parameters required.
The get_services entry for sidecar_validate is the following:
The get_services entry for sidecar_validate.
sidecar_validate:
	Description: Validate a BIDS JSON sidecar (in string form) and return errors.
	Parameters:
		json_string
		schema_string or schema_url or schema_version
		check_for_warnings
	Returns: A list of errors if any.
The Parameters section indicates the fields in addition to the service
that are needed in the request structure.
For example, sidecar_validate requires a HED schema.
One possibility is to read a schema into a string and provide this information in schema_string.
Another possibility is to provide a URL for the schema.
The most-commonly used option is to use schema_version to indicate one of the supported
versions available in the
hedxml directory of the
hed-specification repository on GitHub.
Create a request for the sidecar_validate web service.
jsonText = fileread('../../../datasets/eeg_ds003645s_hed/task-FacePerception_events.json');
request = struct('service', 'sidecar_validate', ...
                 'schema_version', '8.0.0', ...
                 'json_string', jsonText, ...
                 'check_for_warnings', 'on');
This example reads the JSON sidecar to be validated as a character array into the variable jsonText
and makes a request for validation using HED8.0.0.xml.
The request indicates that validation warnings as well as errors should be included in the response.
If you wish to exclude warnings, use off instead of on as the check_for_warnings field value.
The testSidecarServices.m function shows complete examples of the various HED services for JSON sidecars.
Making a service request
The HED services all use the MATLAB webwrite to make HED web service requests.
The following call uses the
sidecar_validate request
from the previous section.
Request the sidecar validation service.
response = webwrite(servicesUrl, request, options);
response = jsondecode(response);
outputReport(response, 'Example: validate a JSON sidecar');
The outputReport.m
MATLAB script outputs the response in readable form with a user-provided table.
If the web server is down or times out during a request,
the MATLAB web_write function throws an exception,
and the script terminates without setting the response.
If the connection completes successfully, the response will set. The next section explains the response structure in more detail.
Decoding a service response
All HED web services return a response consisting of a JSON dictionary with 4 keys as summarized in this table.
Field name |
Meaning |
|---|---|
service |
Name of the requested service. |
results |
Results of the operation. |
error_type |
Type of error if the service failed. |
error_msg |
Explanation of the message if the service failed. |
The jsondecode function translates the JSON dictionary into a MATLAB structure.
The error_type indicates whether the service request completed successfully
and was able to get results.
The error_type does NOT indicate the nature of the results
(for example whether a JSON sidecar was valid or not),
but rather whether the server was able to complete the request without raising an exception.
A failure error_type is highly unusual and indicates some type of
unexpected internal web service error.
Errors of this type should be reported using the
GitHub hed-python issues mechanism.
The results structure has the actual results of the service request.
Field name |
Meaning |
|---|---|
command |
Command executed in response to the service request. |
command_target |
Type of data on which the command was executed. |
data |
Data returned by the service (either processed result or a list of errors). |
msg_category |
Success or warning depending on the result of processing the service. |
msg |
Explanation of the output of the service. |
output_display_name |
(Optional) File name for saving return data. |
schema_version |
(Optional) Version of the HED schema used in the processing. |
The results structure will always have command, command_target
fields indicating what operation was performed on what type of data.
The msg_category will be success or warning depending on whether there were errors.
The contents of the data field will contain different information depending on the msg_category.
For example, if a sidecar had validation errors,
results.msg_category will be warning and the results.data value
should be interpreted as a list of errors.
If the sidecar had no errors, results.data will be an empty string.
EEGLAB plug-in integration
EEGLAB is the most widely used EEG software environment for analysis of human electrophysiological (and related) data. EEGLAB combines graphical and command-line user interfaces, making it friendly for both beginners who may who prefer a visual, and automated way of analyzing data as well as experts, who can easily customize, extend, and automate the EEGLAB tool environment by writing new EEGLAB-compatible scripts and functions.
HED is fully integrated into EEGLAB via the HEDTools plug-in, allowing users to annotate their EEGLAB STUDY and datasets with HED, as well as enabling HED-based data manipulation and processing.
Installing HEDTools
HEDTools EEGLAB plug-in can be installed using one of the following ways:
Method 1: EEGLAB Extension Manager:
Launch EEGLAB. From the main GUI select:
File –> Manage EEGLAB extension
The extension manager GUI will pop up.
From this GUI look for and select the plug-in HEDTools from the main window, then click into the Install/Update button to install the plug-in.
Method 2: Download and unzip
Download the zip file with the content of the plug-in HEDTools either from the EEGLAB plug-ins summary page.
Unzip file into the folder ../eeglab/plugins and restart the eeglab function in a MATLAB session.
Annotating datasets
We will start by adding HED annotations to the EEGLAB tutorial dataset.
After installing the HEDTools open the EEGLAB main window and load the dataset by selecting the menu item:
File –> Load existing dataset .
Selecting the tutorial dataset under your eeglab installation eeglab/sample_data/eeglab_data.set.
Read a description of the dataset and of its included event codes by selecting:
Edit –> About this dataset:
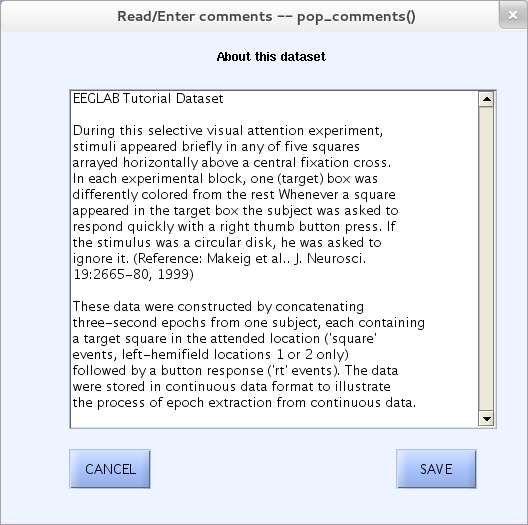
The description gives a general idea of the codes found in the event structure. Yet, inquisitive researchers interested in the nature of the stimuli (e.g., color and exact location of the squares on the screen) would have to look up the referenced paper for details.
Our goal in using HED tags is to describe the experimental events that are recorded in the EEG.event data structure in sufficient detail that anyone using the dataset in the future will not need to find and read a separate, detailed description of the dataset or study to understand the recorded experimental events. As demonstrated below, such annotation will allow us to extract epochs using meaningful HED tags instead of the alphanumeric codes often associated with shared EEG data.
Launching EEGLAB HEDTools
To add and view HED tags for the dataset, from EEGLAB menu, select:
Edit –> Add/Edit event HED tags.
HEDTools will extract information from the EEG.event structure, automatically detecting the event structure fields and their unique values.
The HEDTools ignore the fields the event structure fields .latency, .epoch, and .urevent.
A window will appear asking you to verify/select categorical fields:
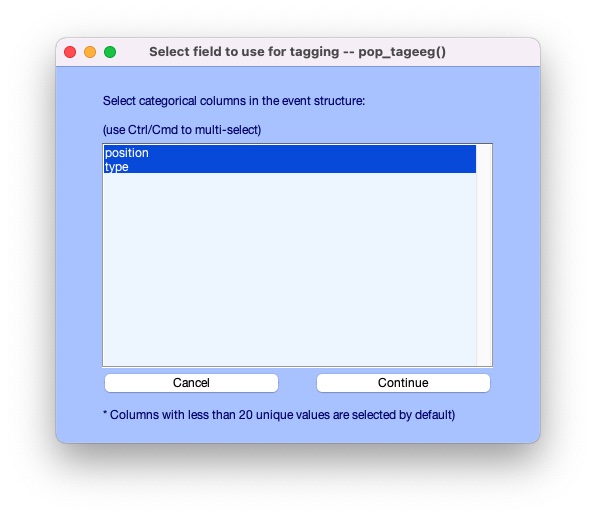
Here both position and type are categorical fields. HEDTools automatically selects fields with less than 20 unique values to be categorical, but the user can modify which values are chosen.
CTagger (for ‘Community Tagger’) is a graphical user interface (GUI) built to facilitate the process of adding HED tags to recorded events in existing datasets. Clicking Continue brings up the CTagger interface:
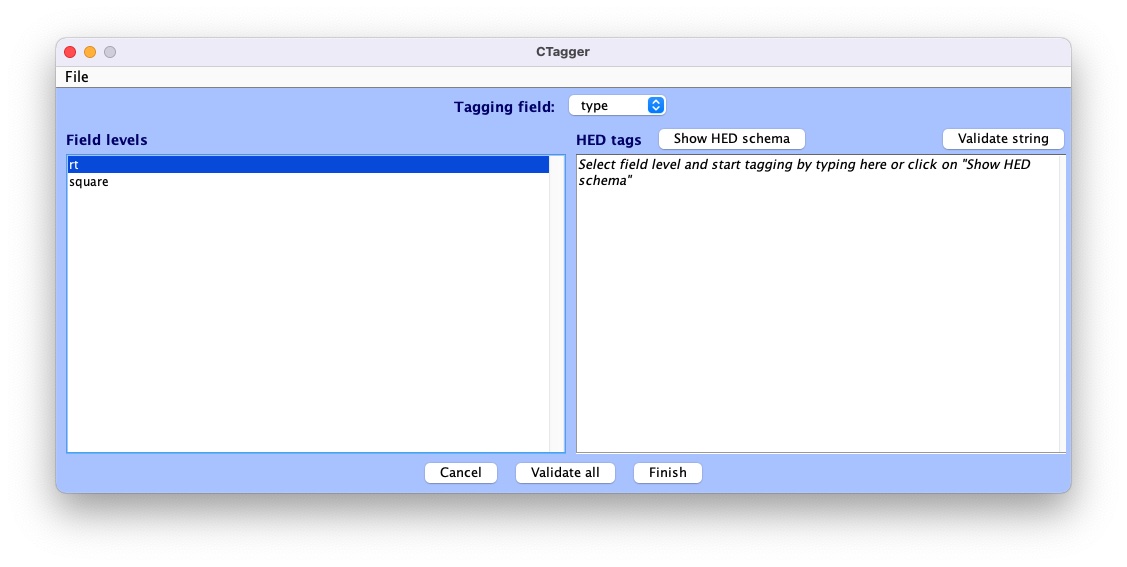
The CTagger GUI is organized using a split window strategy. The left window shows the items to be tagged, and the right window shows the current HED tags associated with the selected item. The Show HED schema button brings up a browser for the HED vocabulary.
Through the CTagger GUI, users can explore the HED schema, quickly look up and add tags (or tag groups) to the desired event codes, and use import/export features to reuse tags on from other data recordings in the same study.
The process of tagging is simply choosing tags from the available vocabulary (using the HED schema browser) and associating these tags with each event code.
Once familiar with HED and the vocabulary, most users just type the tags directly in the tag window shown on the right.
CTagger is used as part of the HEDTools plug-in in this tutorial, but it can also be used as a standalone application.
Instructions on downloading and using the standalone version of CTagger, as well as step-by-step guide on how to add HED annotation with CTagger, can be found at in Tagging with CTagger.
Tagging the events
A brief step-by-step guide to selecting tags can be found at HED annotation quickstart. The following shows example annotations using the process suggested in the quickstart. we will import the annotation saved in the _events.json file format. Download the file eeglab-tutorial_events.json then select:
File –> Import –> Import BIDS events.json file
to import it to CTagger. You can now review all the tags via:
File –> Review all tags
Validation
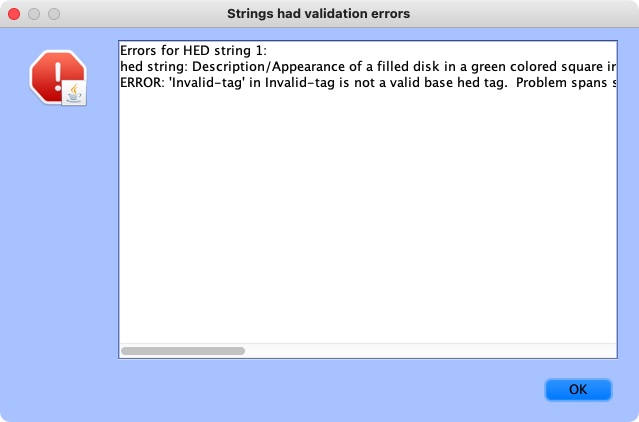
The last step of the annotation process is to validate the HED annotations. Click on the Validate all button at the bottom pane. A window will pop up showing validation results. If there are issues with the annotation, there will be a line for each of the issues found.
Here is an example of validation log file with issues:
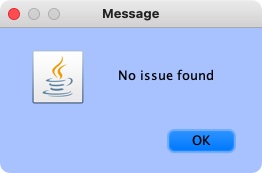
If the annotation was correct, a message will appear confirming the validity:
Click Finish on the main CTagger window to end the annotation.
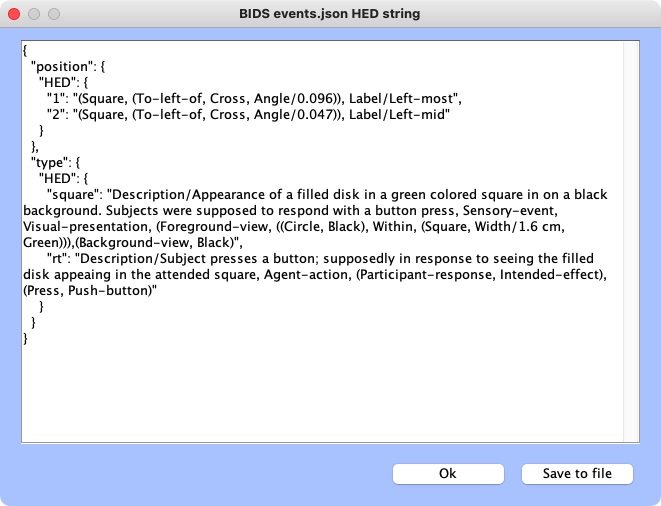
The tag review window will show up again for a final review and the option to save the annotation into an _events.json file for distribution just as with the eeglab-tutorial_events.json. Hit Ok to continue after that.
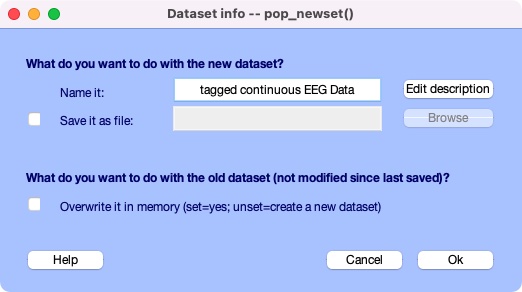
A last window will pop up asking what you would like to overwrite the old dataset with the tagged one or save new dataset as a separate file. Click Ok when you’re done.
You just finished tagging! HEDTools generates the final HED string for each event by concatenating all tags associated with the event values of that event (separated by commas). The final concatenated version is put the string in a new field HED in EEG.event.
HED-based epoching
The EEGLAB pop_epoch function extracts data epochs that are time locked to specified event types. This function allows you to epoch on one of a specified list of event types as defined by the EEG.event.type field of the EEG structure.
HEDTools provides a simple way for extracting data epochs from annotated datasets using a much richer set of conditions. To use HED epoching, you must have annotated the EEG dataset.
If the dataset is not tagged, please refer to Annotating datasets on how to tag a dataset.
Start by choosing the menu option: Tools –> Extract epochs by tags:

This will bring up a window to specify the options for extracting data epochs:
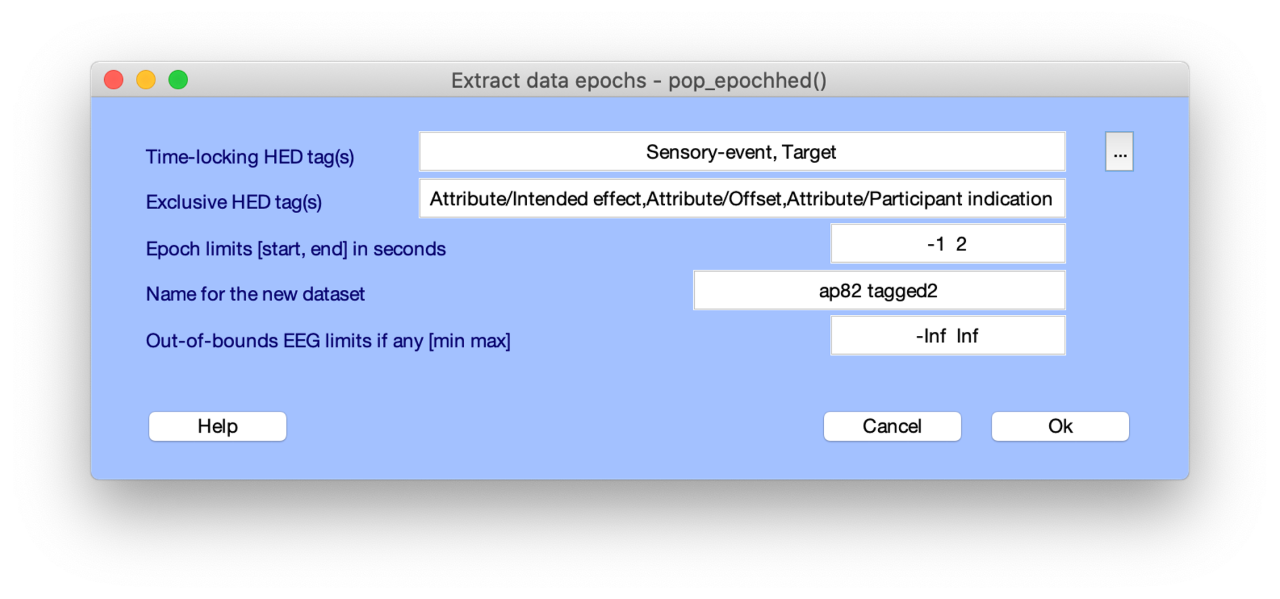
The pop_epochhed menu is almost identical to the EEGLAB pop_epoch menu with the exceptions of the first input field (Time-locking HED tag(s)) and the second input field (Exclusive HED tag(s)).
Instead of passing in or selecting from a group of unique event types, the user passes in a comma separated list of HED tags. For each event all HED tags in this list must be found for a data epoch to be generated.
Clicking the adjacent button (with the label …) will open a search tool to help you select HED tags retrieved from the dataset.
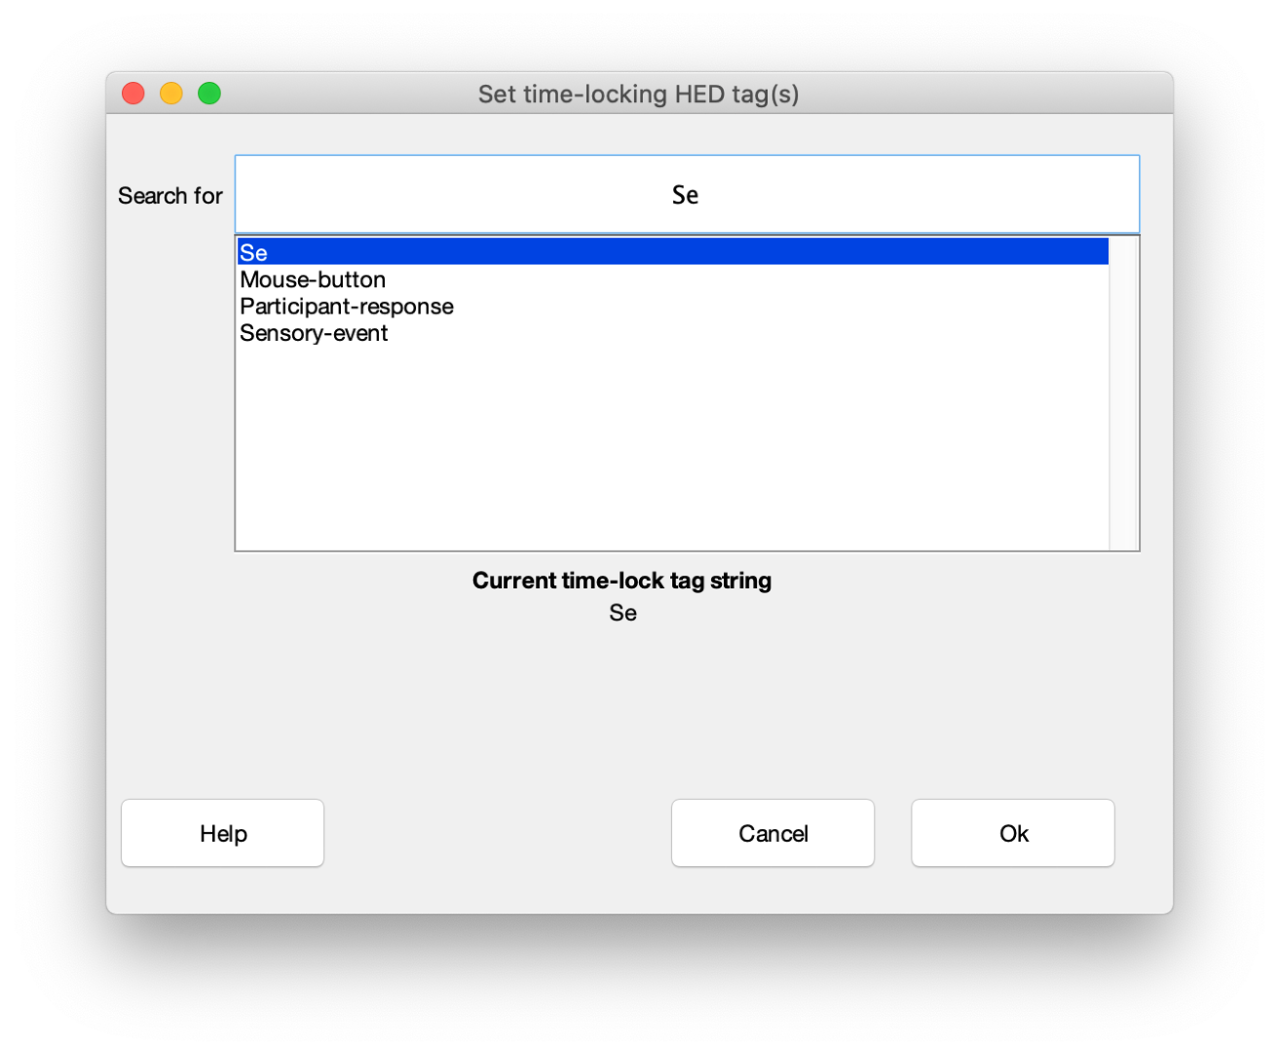
When you type something in the search bar, the dialog displays a list below containing possible matches. Pressing the “up” and “down” arrows on the keyboard while the cursor is in the search bar moves to the next or previous tag in the list.
Pressing “Enter” selects the current tag in the list and adds the tag to the search bar. You can continue search and add tags after adding a comma after each tag. When done, click the Ok button to return to the main epoching menu.
Python HEDTools in MATLAB
You can run functions from the Python hedtools library
directly in MATLAB versions R2019a or later.
With these tools you can incorporate validation, summary, search, factorization,
and other HED processing directly into your MATLAB processing scripts without
reimplementing these operations in MATLAB.
Note: For your reference, the source for hedtools is the
hed-python GitHub repository.
The code is fully open-source with an MIT license.
The actual API documentation is available here,
but the tutorials and tool documentation for hedtools on
HED Resources provides more
examples of use.
Getting started
The hedtools library requires a Python version >= 3.7.
In order to call functions from this library in MATLAB,
you must be running MATLAB version >= R2019a and have a
compatible version of Python
installed on your machine.
The most difficult part of the process for users who are unfamiliar with Python is
getting Python connected to MATLAB.
Once that is done, many of the standard hedtools functions have
MATLAB wrapper functions,
which take MATLAB variables as arguments and return MATLAB variables.
Thus, once the setup is done, you don’t have to learn any additional Python syntax to use the tools.
You should only have to do this setup once, since MATLAB retains the setup information
from session to session.
Steps for setting up Python HEDtools for MATLAB.
Step 1: Find Python. If yes, skip to Step 3.
Step 2: Install Python if needed .
Step 3: Connect Python to MATLAB. If already connected, skip to Step 4.
Step 1: Find Python
Follow these steps until you find a Python executable that is version 3.7 or greater. If you can’t locate one, you will need to install it.
Does MATLAB already have a good version of Python you can use?
In your MATLAB command window execute the following function:
pyenv
The following example response shows that MATLAB is using Python version 3.9
with executable located at C:\Program Files\Python39\pythonw.exe.
  PythonEnvironment with properties:

          Version: "3.9"
       Executable: "C:\Program Files\Python39\pythonw.exe"
          Library: "C:\Program Files\Python39\python39.dll"
             Home: "C:\Program Files\Python39"
           Status: NotLoaded
    ExecutionMode: InProcess
If MATLAB has already knows about a suitable Python version that is at least 3.7, you are ready to go to Step 4: Install HEDTools. Keep track of the location of the Python executable.
If the pyenv did not indicate a suitable Python version, you will need to
find the Python on your system (if there is one), or install your own.
There are several likely places to look for Python on your system.
For Linux users:
Likely places for system-space installation are
/bin,/local/bin,/usr/bin,/usr/local/bin, or/opt/bin. User-space installations are usually your home directory in a subdirectory such as~/binor~/.local/bin.
For Windows users:
Likely places for system-space installation are
C:\,C:\Python, orC:\Program Files. User-space installations default to your personal account inC:\Users\yourname\AppData\Local\Programs\Python\python39whereyournameis your Windows account name andpython39will be the particular version (in this case Python 3.9).
If you don’t have any success finding a Python executable, you will need to install Python as described in Step 2: Install Python if needed.
Otherwise, you can skip to Step 3:Connect Python to MATLAB.
Warning
You need to keep track of the path to your Python executable for Step 3.
Step 2: Install Python if needed
If you don’t have Python on your system, you will need to install it. Go to Python downloads and pick the correct installer for your operating system and version.
Depending on your OS and the installer options you selected, Python may be installed in your user space or in system space for all users.
You should keep track of the directory that Python was installed in.
You may want to add the location of the Python executable to your PATH. (Most installers give you that option as part of the installation.)
Step 3: Connect Python to Matlab
Setting the Python version uses the MATLAB pyenv function with the 'Version' argument
as illustrated by the following example.
Example MATLAB function call connect MATLAB to Python.
>> pyenv('Version', 'C:\Program Files\Python39\python.exe')
Be sure to substitute the path of the Python that you have found.
Notice that the executable listed in Step 1 was pythonw.exe, but we have used python.exe here
to indicate the command line version.
Use the MATLAB pyenv function again without arguments to check that your installation is as expected.
Example response for pyenv all with no arguments after setting environment.
 PythonEnvironment with properties:

          Version: "3.9"
       Executable: "C:\Program Files\Python39\python.exe"
          Library: "C:\Program Files\Python39\python39.dll"
             Home: "C:\Program Files\Python39"
           Status: NotLoaded
    ExecutionMode: InProcess
Step 4: Install HEDTools
The general-purpose package manager for Python is called pip.
By default, pip retrieves packages to be installed from the PyPI
package repository. You will need to use the version of pip that corresponds
to the version of Python that is connected to MATLAB.
This may not be the default pip used from the command line.
Command to install hedtools in MATLAB.
To install the latest released version of hedtools type a pip command such as the
following in your MATLAB command window.
system('"C:\Program Files\Python39\Scripts\pip" install hedtools')
Use the full path of the pip associated with the Python that you are using with MATLAB
Giving the full path to pip corresponding to the Python installation that MATLAB
is using ensures that MATLAB knows about HEDtools.
(The version of MATLAB that Python is using may not be the same as the Python in the system PATH.)
Also watch the resulting messages in the command window to make sure that HEDtools was successfully installed. In the case of the above example, the Python being used is in system space, which requires administrator privileges.
The first line of the output was:
Defaulting to user installation because normal site-packages is not writeable
On Windows these packages will be found in a site-packages directory such as:
`C:\Users\username\AppData\Roaming\Python\Python39\site-packages`
On Linux these packages might be found in directory such as:
/home/username/.local/lib/python3.9/site-packages/
Warning
If your system had a Python 2 installed at some point, your Python 3
executable might be named python3 rather than python.
Similarly, the pip package manager might be named pip3 instead of pip.
The following MATLAB statement can be used to test that everything was installed correctly.
Test that everything is installed.
pyrun("from hed import _version as vr; print(f'Using HEDTOOLS version: {str(vr.get_versions())}')")
If everything installed correctly, the output will be something like
Using HEDTOOLS version: {'date': '2022-06-20T14:40:24-0500', 'dirty': False, 'error': None, 'full-revisionid': 'c4ecd1834cd31a05ebad3e97dc57e537550da044', 'version': '0.1.0'}
MATLAB wrappers for HEDTools
The hedtools_wrappers directory in the hed-examples GitHub repository contains MATLAB wrapper functions for calling various commonly used HED tools.
Direct calls to HEDTools
Wrapper functions are provided to some of the more commonly used functions in the HEDTools suite.
The following example shows the MATLAB wrapper function validateHedInBids.m, which contains the underlying calls to HEDTools Python BIDs validation.
A MATLAB wrapper function for validating HED in a BIDS dataset.
function issueString = validateHedInBids(dataPath)
    py.importlib.import_module('hed');
    bids = py.hed.tools.BidsDataset(dataPath);
    issues = bids.validate();
    issueString = string(py.hed.get_printable_issue_string(issues));
Example MATLAB calling code for this function:
dataPath = 'H:\datasets\eeg_ds003645s_hed';
issueString = validateHedInBids(dataPath);
if isempty(issueString)
    fprintf('Dataset %s has no HED validation errors\n', dataPath);
else
    fprintf('Validation errors for dataset %s:\n%s\n', dataPath, issueString);
end
In above example assumes that the BIDS dataset was located at H:\datasets\eeg_ds003645s_hed.
We tested it with the eeg_ds003645s_hed available on GitHub.
You can download and use this test data or set dataPath to the root directory of your own dataset.
Calls to HED remodeling tools
Many of the most useful HEDTools functions are packaged in the HED remodeling tool suite. These tools allow operations such as creating summaries, validating the dataset, and transforming event files to be run on an entire dataset.
The following example illustrates a call that creates a summary of the experimental conditions for a HED-tagged dataset.
A MATLAB wrapper function for a remodeling operation to create a summary.
function runRemodel(remodel_args)
    py.importlib.import_module('hed');
    py.hed.tools.remodeling.cli.run_remodel.main(remodel_args);
Example MATLAB calling code for this function:
dataPath = 'G:\ds003645';
remodelFile = 'G:\summarize_hed_types_rmdl.json';
remodel_args = {dataPath, remodelFile, '-b', '-x', 'stimuli', 'derivatives'};
runRemodel(remodel_args);
The command line arguments to the various remodeling functions are
given in a cell array, rather than a regular MATLAB array.
For the remodeling operations, first and second operation must be the dataset root
directory and the remodeling file name, respectively.
In this example, dataset ds003645 has been downloaded from openNeuro to the G:\ drive.
The remodeling file used in this example can be found at
See File remodeling quickstart
and File remodeling tools for
additional information.
The wrapper functions are available on GitHub in
the hedtools_wrappers directory.
MATLAB functions for Python
The following table lists the relevant MATLAB functions that are available. You should refer to the help facility for your version of MATLAB to get the details of what is supported for your version of MATLAB.
MATLAB command |
Purpose |
|---|---|
|
Setup your Python environment in MATLAB. |
|
Run a Python statement and return results. |
|
A recent addition for more advanced argument handling. |
|
Run a Python script from MATLAB. |
The MATLAB matlab.exception.PyException captures error information generated during Python execution.